Installation
Before proceeding, set up your Modbus adaptor first.
Installing the integration
Via HACS - recommended
Use this button to install the integration:

Manual installation
There should be no need to use this method, but this is how:
- Download the zip / tar.gz source file from the release page.
- Extract the contents of the zip / tar.gz
- In the folder of the extracted content you will find a directory 'custom_components'.
- Copy this directory into your Home-Assistant '
' directory so that you end up with this directory structure: ' /custom_components/solax_modbus - Restart Home Assistant Core
Pair your inverter
Now it's only needed to add your inverter to Home Assistant. - a) Click this button:

-
b) if your setup does not support My Home Assistant:
- Navigate to your
Devices & services. - Click
ADD INTEGRATION - Search and select
SolaX Inverter Modbus
- Navigate to your
-
You can have multiple instances of this Integration, just change the default Prefix from SolaX to something else. Ie.
SolaX MainorSolaX Southwest. -
Enter correct Modbus address of your inverter - look at your inverter setting, if the default one does not work.
- Select your inverter type.
- Check Emergency Power Option to load entities about EPS.
- Check Dry Contact Box to load entities about Dry Contact.
- Optional: adjust polling intervals (default/medium/fast) and request timeout to match your device and network.
- Optional: set a name suffix to distinguish multiple inverters.
- Optional: set the max inverter power (kW) to ignore out-of-range readings.
- Optional: enable Parallel Mode if you run a master/slave setup.

-
Different polling intervals are used by plugins that define scan groups (for example SolaX/SolaX LV) or use AUTO grouping. The default polling interval is the one to reduce from 15 if required. Do not try and poll quicker than 5 s on inverters with a baud of 9600.
-
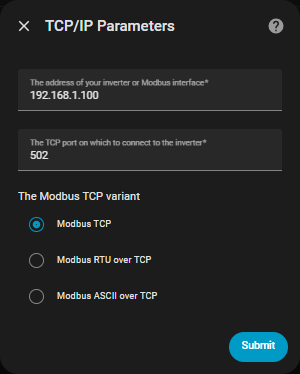
If you use RS485 to Ethernet adaptor:
- Enter the address of your adaptor (IP or hostname).
- Select the Modbus TCP variant if needed (TCP / RTU over TCP / ASCII over TCP).
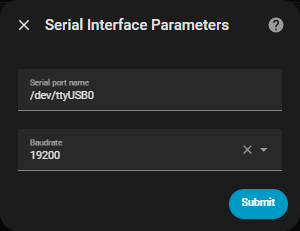
- If you use RS485 to USB adaptor:
- Select the right port.
- If your installation has a tendency to swap between ttyUSB0 and ttyUSB1 you can define it by the id
- /dev/serial/by-id/usb-xyz
- Enter correct baud rate that does match setting on your inverter.
- If you use Hass core HUB: This assumes you have declared and configured a modbus hub in your configuration.yaml file as described in this page. The
configuration.yamlfile then describes the connection method (serial, tcp, ..). You may need to declare one dummy entity for this hub.- Enter the hub name.

- Battery modules: for supported Sofar inverters, an extra battery step appears to enable per-pack battery entities.

Potential known problems:
Sometimes after initial installation, some computed entities are missing. An integration reload (or a HA restart) makes these entities show correct data. Should be solved from 2025.8.8 on.